
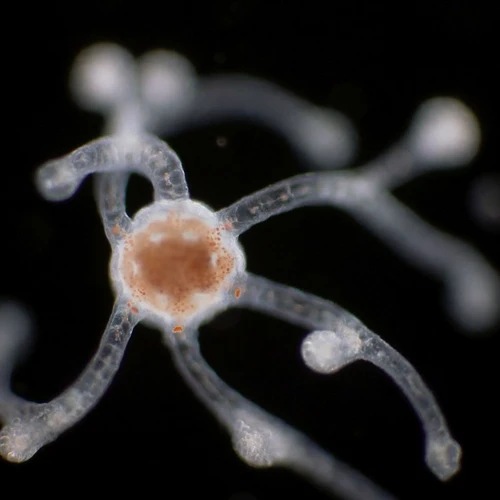
Microscopes have opened up a world of fascinating discoveries for scientists, researchers, and enthusiasts alike. From observing the behavior of microorganisms to analyzing the structure of materials, microscopes provide a window to a world that is not typically visible to the naked eye. But, have you ever wondered how to capture the mesmerizing world under the microscope for others to see? In this article, we will guide you through simple steps on how to film what’s under the microscope, allowing you to share your discoveries with the world.
Contents
Preparations

Before capturing the fascinating world under the microscope, you need to prepare some essentials. Here are the required preparations:
- Microscope: The first and foremost requirement is a microscope. Make sure you have a good quality one, with proper lighting and magnification settings.
- Slide: You cannot capture specimens without a slide. Clean the slide beforehand, and make sure it’s free of dust and debris.
- Specimen: Choose an interesting specimen for filming. It could be anything, from rock to plant cells or even microorganisms. You can also purchase prepared slides of various subjects from science stores.
- Lighting: Proper lighting is crucial when capturing what’s under the microscope. Make sure you have enough light source to illuminate the specimen.
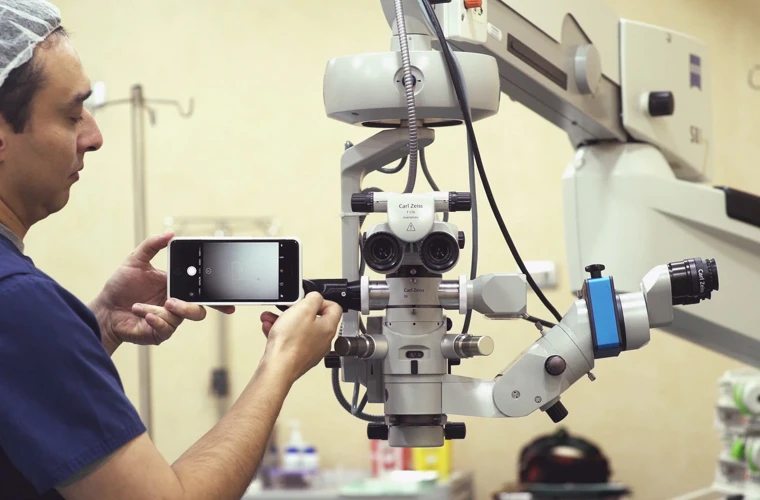
- Camera: To capture what you see, you need a camera system. You can use a digital camera or even a smartphone with a good camera system; just make sure it’s compatible with your microscope.
- Software: To capture still images or record videos with your camera connected to the microscope, you’ll need software that edits images and videos. Some great options include Adobe Premiere, Final Cut Pro, and iMovie.
Once you have all the necessary preparations done, you’re ready to film with a microscope!
Obtaining the Right Equipment

When it comes to capturing the fascinating world under the microscope, having the right equipment is crucial. Here are a few things you will need:
- Microscope: This is the most important piece of equipment. Invest in a good quality microscope with a sturdy base, fine focus adjustment, and the ability to change objectives.
- Light source: Microscopes often come with an built-in illumination system, but it might not be sufficient for all specimens. You can use an external light source such as a light box or an LED ring light for better illumination.
- Slides and coverslips: These are used to hold the specimens in place under the microscope. Slides are usually made of glass and coverslips are used to cover the specimens.
- Specimen preparation materials: Depending on the type of specimen you are observing, you may need materials such as stains, fixatives, and mounting media.
- Camera and software: If you want to capture images or videos of your specimens, you will need a camera and software that can connect to your microscope. Some microscopes come with a built-in camera, but you can also buy a separate camera that attaches to the eyepiece.
Investing in good quality equipment will make a huge difference in the quality of your observations and images. Make sure to do your research and choose the right equipment for your needs.
Setting up the Microscope

Setting up the microscope may seem daunting, but it is a simple process. Follow these easy steps and you will be ready to capture the fascinating world under the microscope.
- Clean the microscope: Use a soft cloth to wipe the lens of the microscope. Make sure there are no smudges or dust particles.
- Connect the power: Connect the power cord to a power outlet and the microscope.
- Adjust the objectives: The objectives are the lenses located near the nosepiece of the microscope. Adjust the objectives by rotating the nosepiece until the desired objective is in position.
- Adjust the focus: Adjust the focus by using the coarse focus knob to move the lens up or down. Then, fine-tune the focus with the fine focus knob. Make sure the specimen is in focus before proceeding.
- Adjust the light: Adjust the amount of light by opening or closing the diaphragm. If additional light is needed, adjust the light source located on the base of the microscope.
- Insert the slide: Place the slide on the stage of the microscope. Secure the slide using stage clips to prevent it from moving.
- View the specimen: Look through the eyepiece and adjust the focus accordingly. To get the best image, adjust the lighting and magnification until it is just right.
With these simple steps, you are now ready to capture the fascinating world under the microscope. Happy exploring!
Capturing the Footage
After preparing your sample and setting up your microscope, it’s time to capture the footage.
- Connect your microscope to a camera or computer. This will allow you to capture the footage and save it for later use.
- Adjust the microscope settings to optimize the image quality. Play around with the focus, contrast, and brightness until you are satisfied with the image.
- Use a micrometer slide to calibrate the stage micrometer. This will allow you to calculate the size of the objects that you are observing.
- Start recording the footage using a screen recording software or a digital camera. Make sure to include the relevant details such as magnification level and the date of the recording.
- Repeat the process with different magnification levels to capture different details of your sample.
- After you have finished capturing the footage, review the recordings and select the best ones for your project.
Capturing the footage is an essential part of observing the fascinating world under the microscope. By following these simple steps, you can capture high-quality footage that can be used for research or educational purposes.
Positioning the Microscope

Positioning the microscope is crucial to obtaining clear and accurate images when studying specimens. Here are the basic steps for positioning a microscope:
| Step | Action |
|---|---|
| Step 1 | Place the microscope on a stable and flat surface. |
| Step 2 | Adjust the arm of the microscope so it is perpendicular to the base. |
| Step 3 | Lower the stage of the microscope so it is at its lowest point. |
| Step 4 | Position the microscope slide on the stage of the microscope and secure it in place using the clips. |
| Step 5 | Use the coarse adjustment knob to move the stage upward until the specimen is in view. |
| Step 6 | Center the specimen in the field of view by adjusting the position of the slide on the stage. |
| Step 7 | Use the fine adjustment knob to bring the specimen into clear focus. |
By following these steps, one can successfully position the microscope for further analysis and observation. Remember that proper positioning is important to obtain accurate images and data analysis.
Adjusting the Focus

The microscope lens clarity is the key to a successful image. Therefore, it is necessary to adjust the focus correctly to produce a clear and sharp image.
To adjust the focus, you need to start by placing your subject specimen onto the microscope stage and carefully adjust the slide’s position until your specimen is in place. Once your specimen is in place, adjust the focus by first identifying the lowest magnification lens on the microscope and tilt it closest to the stage. Begin to move the lens up or down using the coarse adjustment knob until you can see a blurry image of the subject.
Next, you will need to use the fine adjustment knob to adjust the focus more precisely. This knob is much smaller and more sensitive, allowing you to make slight adjustments in focus. Use it to hone in on the area of interest, slowly turning it until your specimen comes into focus.
It is crucial when adjusting the focus to move both the coarse and fine adjustment knobs slowly and smoothly so that you don’t overshoot the point of focus.
Remember that different microscope lenses require different adjustments, so if you change magnification, you may need to readjust the focus. Additionally, as you build skills and increase magnification, you may notice that there is less depth of field in your specimen. Therefore, it is essential to begin by focusing on the area of interest and slowly focus through the subject to get the best image you can.
In conclusion, adjusting the focus is a crucial step in capturing the fascinating world under the microscope. Taking time to master this skill will ensure that you get a clear and accurate image, making your observations much more rewarding.
Operating the Camera

Once you have chosen the right microscope and prepared your sample, it’s time to capture the fascinating world under the microscope. Operating the camera is one of the most crucial parts of this process. Here are some vital tips for operating the camera:
- Check the Camera Settings: Before clicking any pictures, make sure to set your camera settings accurately. Adjust the focus, aperture, shutter speed, and ISO according to your preferences and lighting conditions.
- Use a Tripod: A tripod is an essential accessory while capturing microscopic pictures. It keeps the camera stable and avoids any camera shakes, resulting in perfect shots.
- Take Multiple Shots: To capture the intricacies of a specimen, take multiple shots from different angles and zoom levels. It will give you a better understanding of the sample you’re observing.
- Experiment with Lighting: Experiment with different types of lighting to see what works best for your sample. Try brightfield, darkfield, and phase-contrast lighting techniques to capture varied observations.
- Edit Your Images: After capturing the images, edit them to remove any imperfections and enhance the parts that you want to highlight. Software like Adobe Photoshop or GIMP can come in handy here.
By following these simple tips, you can operate your camera efficiently and capture captivating pictures of the microscopic world. Don’t be afraid to experiment and find out what works best for you. Good luck with your microscopy journey!
Post-Production

After you have captured all the images or videos of the specimens under the microscope, the next step is to edit and enhance them. Post-production is an essential part of creating high-quality microscope footage.
The first step in post-production is to transfer the images and videos from the camera or microscope to your computer. Then, you can use various software programs such as Adobe Photoshop or Lightroom to enhance the images by adjusting the brightness, contrast, and color balance. You can also crop or resize the images to focus on specific details.
For videos, you can use video editing software such as Adobe Premiere or Final Cut Pro to combine, cut, and add effects to your footage. You can also add narration or music to your videos to make them more engaging and informative.
Another technique in post-production is stacking. This involves combining multiple images of the same specimen at different focal lengths to create a single image with enhanced depth of field. This technique is useful when trying to capture very small details that require a high magnification level.
It’s important to note that post-production should only be used to enhance the footage you have already captured. You can’t fix poorly captured footage with editing software. Therefore, it’s crucial to take the time to properly capture the specimens and adjust the microscope settings.
In conclusion, post-production is an essential part of creating high-quality microscope videos and images. With the right tools and techniques, you can enhance your footage, making it more visually appealing and informative. Remember to take your time when capturing the specimens and adjust your microscope settings accordingly to ensure the best possible capture. Finally, use appropriate software programs and techniques to edit and enhance the footage. By following these steps, you can learn how to film under the microscope like a pro.
Editing the Footage
After filming the specimen under the microscope, the next step is to edit the footage. Editing is an essential part when it comes to producing high-quality video. In this section, we will discuss how to edit your footage, step by step.
1. Import the footage into your editing software
The first step is to import your footage into your editing software. Make sure to use high-quality video editing software that can handle high-resolution footage. Adobe Premiere Pro and Final Cut Pro are two popular software options for video editing.
2. Organize your footage
Organizing your footage is essential so that you can easily find and use the clips you need. Create a different folder for every shot and name them appropriately so that you can easily identify them.
3. Trim and cut your footage
Once your footage is organized, you can start trimming and cutting your footage. Remove any unwanted footage and focus on the clips that show the most interesting things under the microscope. Trim the clips to the desired length, and make sure the transition between each clip is smooth.
4. Add transitions and effects
To make your footage more visually appealing, add transitions between clips. You can use fades, dissolves or wipes to create a seamless transition between each clip. Additionally, you can experiment with different effects to enhance the footage, such as color grading and adjusting the contrast.
5. Add sound effects and music
Adding sound effects and music to your video can improve the overall viewing experience. Use sound effects to emphasize on what’s happening in the footage, and add music to evoke emotions in the viewer.
After you have finished editing the footage, export your video in the desired format. Editing the footage might seem intimidating at first, but with practice, it can become a fun and rewarding process. By following the steps outlined here, you can create a visually stunning video showcasing the fascinating world under the microscope.
In conclusion, capturing the world under the microscope might seem like a daunting task, but it is easy if you follow the steps outlined in this article. Understanding how to film what’s under the microscope and how to film with a microscope is crucial, as well as knowing how to edit the footage in post-production. By following these simple steps, you can start creating high-quality microscope videos in no time.
Adding Effects
In today’s digital world, adding effects to the footage has become a common practice. These effects can be used to highlight specific details, add depth, and enhance the overall visual appeal of the video.
When it comes to filming under the microscope, adjusting the settings on the microscope or camera can only take you so far. Adding effects during the post-production process can help you achieve the desired result.
One of the most common effects used in microscope footage is color grading. By adjusting the color temperature, contrast, and saturation of the footage, you can enhance specific areas and draw attention to them. Consider using warm tones for organic matter while cooler tones for inorganic or synthetic materials. Be mindful of where and when to use it as it can also alter the color of the sample sometimes.
Another effect that can be used is slow motion. By slowing down the footage, you can highlight even the smallest movements and present them in a more dramatic way. This effect can be particularly effective when demonstrating the highly intricate reactions and movements occurring in the sample under the microscope.
It is also possible to add overlays and text to microscope footage. Adding overlays can provide context, such as adding information about what the sample is and its origin. Text can also be used to label different parts of the sample or to emphasize key points.
Finally, using sound effects and music can add a whole new dimension to your microscope footage. By adding subtle background sounds or music to the footage, you can create a more immersive experience for your audience. Be careful with the sound choice as some microscopes pick up an unwanted background noise or feedback.
In conclusion, adding effects to microscope footage is a simple yet powerful way to enhance it. By using color grading, slow motion, overlays, text, and sound, you can bring the fascinating world under the microscope to life. Remember always to capture the footage properly following the steps in how to film under the microscope or with a microscope before moving on to post-production.
Frequently Asked Questions
What kind of microscope do I need to capture images under the microscope?
To capture images under a microscope, you will need a microscope that comes equipped with a camera or a digital eyepiece attachment. The camera will allow you to record images and videos of the specimens you are examining, and the digital eyepiece will allow you to view the specimen on a computer screen.
When selecting a microscope for capturing images, there are several options to choose from:
- Compound microscopes: These microscopes are ideal for capturing images of small, transparent samples such as cells, bacteria, or thin tissue sections. They come equipped with a built-in or separate camera that can be connected to a computer through a USB port.
- Stereomicroscopes: These microscopes are used for viewing larger specimens at low magnification. They typically have a digital camera attached to the eyepiece that can be used to capture images and videos.
- USB microscopes: These are digital microscopes that connect directly to a computer through a USB port. They come with built-in cameras and are great for capturing images of specimens that cannot be viewed with a traditional microscope, such as electronic components or small insects.
Choosing the right microscope for your needs will depend on the types of specimens you intend to view and the level of magnification you require. Additionally, it is important to ensure that the microscope and camera are compatible with your computer’s operating system.
Tip: When selecting a microscope for capturing images, consider the resolution of the camera or digital eyepiece. Higher resolution will enable you to capture more detailed images.
How can I best prepare specimens for imaging?
Preparing specimens correctly is crucial to obtain high-quality images. Here are some simple steps to follow:
- Clean the specimen: Use a brush or tissue to remove any debris or dirt from the specimen.
- Fixation: Add fixative solution to preserve the structure of the specimen. This will prevent decay or deformation over time.
- Dehydration: Remove excess water from the specimen using alcohol or acetone. Gradually increasing the concentration of alcohol or acetone will help prevent shrinking or warping of the specimen.
- Embedding: Once the specimen is dehydrated, embed it into a resin or paraffin block to provide support and facilitate handling during the cutting process.
- Sectioning: Use a microtome to slice the embedded specimen into thin sections.
- Staining: Depending on the type of specimen, staining can reveal more details in the image. Hematoxylin and eosin (H&E) is a common staining method used in histology.
By following these steps, you can prepare your specimens correctly and set yourself up for successful imaging.
What software do I need to process and analyze the images?
Processing and analyzing images is an essential part of microscopy. In order to get the most out of your microscopy work, you need to use software that can help you process and analyze your images. Here are some software programs that are commonly used by microbiologists and biologists for image processing and analysis:
- ImageJ: This is the most popular image processing software used in the biological research community. ImageJ is a free and open-source software that can handle a wide range of image formats. It is very user-friendly with a large user community that frequently shares plugins and macros. This software is widely used for analyzing fluorescence microscopy images and is an excellent tool for microscopy beginners.
- FIJI: This is a distribution of ImageJ that has been optimized for scientific imaging. FIJI contains additional plugins and features that are tailored to scientific image processing, such as 3D imaging, image registration, and machine learning tools. It is also free and open-source.
- CellProfiler: This software is specifically designed for high-throughput image analysis. It is great for analyzing large sets of microscopy images and is frequently used in drug discovery and pathology research. It is also free and open-source.
- Icy: Icy is a graphical software environment that is designed for bioimage analysis. It has a user-friendly interface and can handle a wide range of microscopy images. It also has a plugin system that allows users to customize the software to fit their specific needs. Icy is free and open-source.
- QuPath: QuPath is a widely used software for image analysis in pathology. However, it is also great for analyzing microscopy images. QuPath is user-friendly and allows users to combine image analysis with annotation, classification, and visualization. It is also free and open-source.
In conclusion, using the right software to process and analyze microscopy images can greatly enhance your microscopy work. ImageJ, FIJI, CellProfiler, Icy, and QuPath are all excellent options that are free and open-source. No matter which software you choose, remember to familiarize yourself with its features and capabilities to maximize its potential.
What techniques can I use to take clear and detailed images?
To capture clear and detailed images under a microscope, there are several techniques you can use:
- Focus: Adjust the focus until the specimen is in clear view.
- Lighting: Proper lighting is essential for clean and detailed images. Adjust the brightness and angle of the light source until the specimen is well illuminated.
- Stabilization: Use a stable platform for the microscope and a slow shutter speed or a remote shutter release to prevent shaking and blurring of the image.
- Aperture: A smaller aperture will result in a larger depth of field and more detail in the image.
- Exposure: Adjust the exposure to ensure the image is properly exposed.
By using these techniques, you can capture fascinating images of the microscopic world with ease.
What are the safety precautions I need to take while using a microscope?
Using a microscope can be an exciting and insightful experience, but it’s important to take necessary safety precautions to avoid any potential hazards. Here are some important safety tips to follow while using a microscope:
- Wear protective gear: Wear protective gear such as gloves, goggles, and lab coats to protect yourself from any harmful substances you may come in contact with while using the microscope.
- Handle slides with care: Glass slides can easily break or shatter, so handle them carefully to avoid cutting or injuring yourself.
- Clean the microscope: Before and after use, clean the microscope’s lenses and surfaces with a soft cloth or lens paper to avoid scratches or damage to the lenses.
- Stay organized: Keep the work area organized and clutter-free to avoid accidentally knocking over any equipment or materials.
- Turn off the microscope: After you are done using the microscope, make sure to turn it off and unplug it to avoid any potential electrical hazards.
- Be mindful of chemicals: When using chemicals or stains on slides, be sure to read and follow all safety precautions on the chemical’s label.
- Follow laboratory rules: Follow all laboratory rules and regulations set by your instructor or supervisor to ensure your safety and the safety of others in the lab.
By following these safety precautions, you can enjoy the fascinating world under the microscope while staying safe at the same time.
Conclusion
The world under the microscope is a fascinating one, full of tiny wonders that can be easily missed. With these simple steps, you can start exploring and capturing this world with ease. With a little practice, you will be able to take beautiful photographs of the microcosmos.


