
Observing blood under a microscope can reveal crucial information about a person’s health. However, for accurate results, it is essential to handle the blood properly and prepare slides correctly. Knowing how to get blood for a microscope is the first step towards obtaining clear and informative samples. In this article, we will guide you through the easy steps to follow to ensure amazing results when preparing blood for the microscope. Whether you are a student or a researcher, understanding the proper techniques for extracting and preparing blood samples will yield precise and valuable results. Read on to learn how to get blood for a microscope effortlessly.
Contents
Preparing Blood Sample for Microscopy

Sample Collection
Before collecting the blood sample, it is important to properly wash your hands and disinfect the collection site with an antiseptic solution. This helps to prevent contamination of the sample and ensures accurate results.
Next, select a site for collection, which is usually the finger or the earlobe. Use a sterile lancet to make a small cut and allow a few drops of blood to form. Let the first drop of blood be wiped away with a sterile cotton ball or gauze pad, and then collect a few drops of blood into a clean glass slide or on a clean coverslip.
Blood Smear Preparation
After collecting the blood sample, the next step is to prepare a blood smear for microscopy. A blood smear is a thin layer of blood that is spread out on a microscope slide and stained to allow for clear visualization of the blood cells.
To prepare a blood smear, add a drop of blood to one end of a clean glass slide and spread it out using the edge of another slide. Use a smooth, steady motion to spread the blood in a thin and even layer. Let the smear air dry for a few minutes, and then fix it with methanol or ethanol.
The final step in preparing a blood smear is staining. There are several different stains that can be used, such as Wright’s stain, Giemsa stain, and Romanowsky stain. Follow the instructions for your chosen stain and carefully observe the staining time, rinse, and drying procedures.
How to view white blood cells under microscope: After staining, you can view the blood smear under a microscope. Adjust the focus and magnification to observe the different types of blood cells, including white blood cells, red blood cells, and platelets.
Viewing Blood Under the Microscope
Select a Microscope
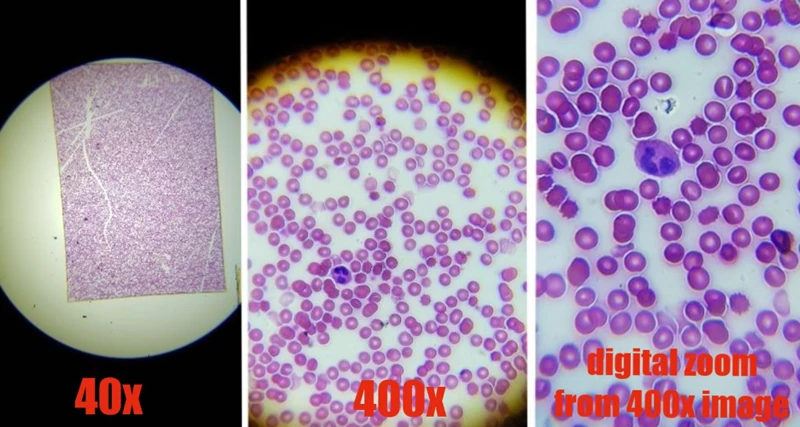
When it comes to viewing blood under a microscope, it’s important to choose the right microscope. A compound microscope with a magnification range of at least 400x should be able to show individual blood cells. If you have access to a microscope with a higher magnification range, that’s even better.
Focus the Image
Once you have your microscope set up, it’s time to focus the image. Start with the lowest magnification and focus on one area of the blood smear. Slowly increase the magnification until you get to your desired level. Make sure the image is in focus and adjust the light as needed.
Viewing the Blood Smear
When viewing the blood smear, you should be able to see both red and white blood cells. To test which white blood cells are stained under microscope, you can use a staining technique like Wright’s stain. This will help differentiate between different types of white blood cells.
Remember to use caution when handling blood and always follow proper safety guidelines. With these easy steps, you’ll be able to view blood under the microscope and achieve amazing results.
Staining White Blood Cells

Selecting a Stain
Choosing the right stain for your blood sample is crucial for obtaining clear and accurate results. There are various options available, including Wright’s stain, Giemsa stain, and Leishman’s stain. It is advisable to consult with a laboratory expert or refer to the literature to select the appropriate stain for your sample.
Applying the Stain
The staining process can vary slightly depending on the chosen stain. In general, the process involves adding the stain to the blood sample and allowing it to sit for a specified time. Following this, the sample is rinsed with distilled water and air-dried. It is essential to follow the instructions accurately to ensure clear and accurate results.
Observing the Stained Cells
After applying the stain, it is recommended to view the blood sample under a microscope. Make sure to use oil immersion lens for optimal observation of the stained cells. Understanding the appearance of different types of white blood cells is crucial to determine the presence of any abnormalities. Take notes and images to record and analyze the results accurately.
Staining white blood cells is an essential step in obtaining clear and accurate results when exploring how to get blood under a microscope. By selecting the appropriate stain, applying it correctly, and observing the sample under the microscope, you can achieve the best results possible.
Taking Pictures of White Blood Cells

Selecting a Camera
When it comes to selecting a camera for taking pictures of white blood cells, you want to choose a camera with a high resolution and a zoom function. A DSLR camera with a macro lens is ideal for this purpose. A point-and-shoot camera can also work well if it has a good zoom function and can take high-resolution images.
Mounting the Camera
Before taking pictures, you need to mount the camera onto the microscope securely. Use a special adapter that attaches to the camera’s tripod mount and the microscope’s eyepiece. This will ensure that your camera is perfectly aligned with the microscope lens.
Adjusting Camera Settings
Adjusting your camera’s exposure and focus settings is crucial to getting clear, detailed images of white blood cells. Set the camera to manual mode and adjust the aperture, ISO, and shutter speed manually to get the best possible image. Use a high shutter speed to avoid blurry images, as blood cells move rapidly.
Taking Pictures
Now that everything is set up, it’s time to take pictures. Use the how to take a microscope blood sample techniques to prepare a slide of blood for observation. Place the prepared slide under the microscope lens and begin focusing the camera. Zoom in and adjust the focus as needed, and take multiple shots from different angles. When you’re finished, review the images to ensure that they’re clear and detailed enough to analyze.
Making the Most of Your Microscope Blood Sample
Recording Observations
When preparing a blood sample for microscopy, it is essential to record your observations accurately. Take note of any abnormalities or irregularities that you see under the microscope. Use clear and concise language to describe the size, shape, color, and distribution of blood cells.
One helpful tip is to use a pre-made chart to record your observations. This method is particularly useful when analyzing multiple blood samples at once. By doing so, you can ensure that your observations are consistent and prevent any confusion when it comes time to analyze your data.
Analyzing Data
After you have recorded your observations, the next step is to analyze your data. Look for patterns and abnormalities in your blood samples that may indicate illness or disease. It is essential to examine your results closely to make an accurate diagnosis.
To analyze your data accurately, you must remain objective and make comparisons with normal blood samples. Look for cells that are larger or smaller than average or cells that have an unusual shape or color. By identifying abnormalities and irregularities in your blood samples, you can make an accurate diagnosis and recommend appropriate treatment.
Overall, preparing a blood sample for microscopy can be a challenging yet rewarding experience. By taking accurate observations and analyzing your data carefully, you can use your microscope to diagnose illnesses and diseases accurately.
Frequently Asked Questions
What type of microscope should I use to observe blood samples?
When it comes to observing blood samples, a compound microscope is the ideal choice. This type of microscope uses a system of two or more lenses to view small, transparent specimens. For blood samples, a brightfield compound microscope with a high magnification power (around 1000x) is recommended.
It is also important to choose a microscope with proper illumination to enhance contrast and visibility of the sample. A microscope with a built-in LED light source or an external light source can be used to achieve this.
In addition, a microscope with a mechanical stage is preferable to allow for precise movement of the slide and easy focusing on specific areas of interest within the blood sample.
Overall, a brightfield compound microscope with high magnification power, proper illumination, and a mechanical stage are the key features to look for when selecting a microscope for observing blood samples.
What is the best way to prepare a blood sample for viewing?
- The first step of preparing a blood sample for viewing is to choose the right equipment. You will require a microscope, slides, cover slips, lancets or needles, alcohol swabs, and a pipette or glass rod.
- The second step is to sterilize the equipment before usage. Clean the microscope, slides, cover slips, lancets or needles, and pipette or glass rod with alcohol swabs to prevent any contamination.
- Next, prepare your patient. Explain the procedure and have them wash their hands with soap and warm water.
- Choose a site for blood collection, usually the fingertip or earlobe. Clean the area with antiseptic solution and wait for it to dry.
- Prick the chosen site with a lancet or needle to draw out a small amount of blood.
- Transfer the blood onto the slide using the pipette or glass rod.
- Spread the blood out evenly with another slide, creating a thin smear. Allow it to air dry completely.
- To fix the blood smear, pass the slide through a flame two to three times. This will cause the proteins in the blood to denature rapidly and fix the cells to the slide.
- Stain the blood sample with the desired stain, such as Wright’s stain, and add a cover slip.
- Place the slide on the microscope and adjust the focus until the cells are in focus.
Using these simple steps, you can prepare a blood sample for viewing under a microscope with incredible results. It allows you to diagnose medical conditions, evaluate blood disorders, and identify various cell types.
What safety precautions should I take when handling blood samples?
Handling blood samples can pose a risk of infection and contamination. To ensure safety, it is important to follow proper precautionary measures. Here are a few things you should keep in mind when handling blood samples:
- Wear protective gloves and a lab coat to avoid coming into direct contact with the blood sample. Ensure that the lab coat has long sleeves and covers your entire body for added protection.
- Avoid eating, drinking, or applying makeup when handling blood samples to prevent the potential ingestion of harmful pathogens.
- Handle the sample carefully and avoid shaking or dropping the container to avoid splashing or spreading of the blood.
- Disinfect the work area before and after handling blood samples. Use a disinfectant solution to wipe down all surfaces, including equipment.
- Label the sample container accurately and clearly to avoid mix-ups or confusion. Ensure that the container is tightly sealed to prevent leakage or spilling.
- Dispose of the waste materials – used gloves, lab coats, and any contaminated materials – appropriately. Place them in an appropriately labeled biohazard bag for safe disposal.
By following these safety precautions, you can ensure that you handle blood samples safely and avoid any potential risks of infection or contamination.
Is it possible to observe live blood cells through a microscope?
Yes, it is possible to observe live blood cells through a microscope with the use of specific techniques and equipment. By preparing a blood smear slide and using a specialized microscope, several types of live blood cells can be visualized and studied, including red blood cells, white blood cells, and platelets. This technique, known as live blood microscopy, can provide valuable information about an individual’s overall health and can aid in the diagnosis of various conditions. However, it requires a skilled technician and specialized equipment to perform accurately.
How can I be sure that the blood sample I’m using is sterile?
To ensure that the blood sample you are using is sterile, you should follow strict sterilization protocols. Start by cleaning the site of blood collection with an antiseptic solution. The collection equipment also needs to be sterilized before use. Use sterile gloves throughout the process to prevent contamination. Finally, store the blood sample in a sterile container until further use. By following these steps, you can be confident that your blood sample is sterile and ready for use in your microscope.
Conclusion
Microscopy is an important and interesting field of study. With the right preparation and easy-to-follow steps, you can get the perfect sample of blood for your microscope. Start by selecting the most suitable sample, and then follow the steps outlined in this article to ensure the best results. Good luck!
References
- Centers for Disease Control and Prevention. Microscopy Data Collection. Retrieved from https://www.cdc.gov/labs/resources/data-collection/microscopy.html
- Bishop, A. J. (2018). Microscopy Techniques. Retrieved from https://www.ncbi.nlm.nih.gov/books/NBK210863/
- Kaur, S. (n.d.). Microscopy Techniques. Retrieved from https://www.nature.com/scitable/topicpage/microscopy-techniques-14122205


